CQ+ Getting Started, Training & Help
Welcome to the Getting Started page for CQ+. Please use the tabs below to find help on what you’re looking for. If you need further assistance, contact the CQ Hotline at 202-650-6511 or email hotline@cqrollcall.com for immediate assistance.
[/et_pb_text][/et_pb_column][/et_pb_row][et_pb_row][et_pb_column type=”4_4″][et_pb_tabs admin_label=”Tabs”][et_pb_tab title=”Following”]Following is a simple yet powerful way of tracking the information you need to do your job. Following any bill, member, committee or topic in CQ+ or CQ.com will populate your CQ+ Following stream with related documents, news and actions in real time.
What is the Following feed and how does it work?
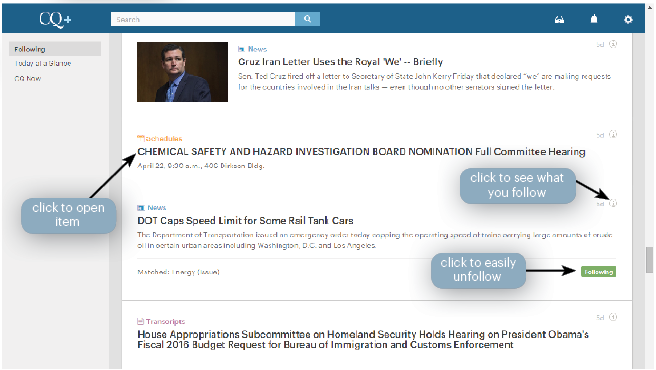
Click on the CQ+ icon in the upper lefthand corner of your navigation bar to visit the “Following” feed. “Following” is a feed of real-time CQ content that we provide based on alerts and follows you’ve set up on CQ.com or in CQ+. Click on the headlines to navigate to the items. You can see the alert(s) matched by clicking the info button to the right of an item in the feed.
How do I hide an alert or follow from my stream?
If you see an alert or follow set up on an item that you no longer wish to receive alerts on, simply click “Unfollow.” You can click the info button again to close the panel. Please note that unfollowing an item in the “Following” feed will remove the alert from your CQ.com subscription as well. Once you’ve unfollowed an item it will no longer appear in your feed, though past items will remain.
How do I deactivate emails but keep the follow in my stream?
If you want to turn off emails for an alert or follow but still want the items to appear in your Following feed, go to Settings>Following Info and find the item you would like to deactivate. Click the flag of the following button and select “Following feed only” to turn off email alerts for that item.

How do I view all of my alerts and follows?
To view all of your alerts and follows, go to Settings>Following Info. From this menu you can unfollow any items you currently follow. You can also view all of your alerts and follows at the CQ.com alert manager.
How do I edit or delete a custom alert?
If you want to edit or delete a custom alert, please visit CQ.com>Alerts & Tools>Manage Alerts. Find the name of the alert you want to edit or delete in the list and modify the alert in CQ.com. Your changes will immediately take effect in your CQ+ account.
What other feeds are available in CQ+?
Beneath the “Following” feed in the left rail are two more streams: Today at a Glance and CQ Now.
- Today at a Glance is a daily Capitol Hill schedule of important events.
- CQ Now is a near-real-time feed of news and information from all parts of the newsroom. These are the same CQ.com features you’ve come to rely on for the information you need most. Click on the headlines to navigate to the items.
Projects are where you can store CQ’s information alongside your own notes and reports, using them to organize data, collaborate with your colleagues, quickly access your frequented content and easily create reports.
How do I create a new project?
To create a new project, hit the “New project” button on the projects page. Name your project and add an optional description. You can change the order your projects appear in by dragging and dropping them in the left rail.
How do I add content to my project?
To add content to your new project, navigate to a bill, member, topic, vote and committee page using search or streams, and click the “Add to project” button on the toolkit along the top of the page. You can all kinds of content in CQ+ to projects whenever you see the “Add to project” button. You can sort the display order of items in your project by clicking on the column titles.
How do I share my project with other members in my account?
To share a project with other members in your account, click the “Share” button in the lefthand corner of the project page, beneath the project description. Other users in your account will be notified that you shared the project with them through their notification center. Please note that sharing a project with other users in your account will allow them to edit your project or use it to create reports. To make a project private again after it has been shared, click “Make Private” in the lefthand corner of the project page.
How do I hide a project from my view?
To hide a project from your view, click the “Archive” button in the righthand corner of the project page. The project will move to the Project Archive. To restore the project, click the Project Archive, then open the project and click “Unarchive.”
How do I delete a project?
To delete a project, click the “Delete forever” button in the righthand corner of the project page. A project cannot be restored after it is deleted. You cannot delete a project that was created by someone else in your account.
How do I star a project?
To star a project or item in a project, click the star next to the project title or the star in the row of the selected item. To view your starred items, click “Starred Items” in the left rail.
How do I change what items are in my project?
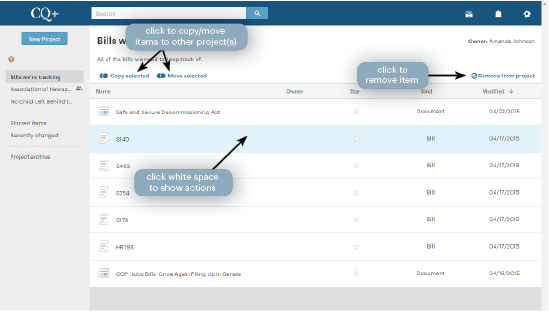
Items can live in more than one project. To add an item to another project while keeping it in its project of origin, click the white space next to the item’s headline in the project page. You’ll see a few actions appear beneath the project description. You can choose to copy the item to another project, move the item to another project, or remove the item from the project.
You can also drag and drop items into other projects to quickly move them.
Custom Fields are metadata fields you can create across all bill, member, topic, committee or vote pages, then use to delineate your specific data for that item. For example, you can create an “Organization’s Stance” field with a dropdown list of options like “Support” and “Oppose.” The field will now appear on all bill pages, and you can use the field to specify your organization’s stance on any bill. You can also use that information quickly and easily in reports. Custom fields are visible to all users in your account, and anyone in your account can create, edit or delete a custom field.
How do I create a new custom field?
To create a new custom field, select the tab of the page type to which you’d like to add the custom field. Click “New Custom Field,” then enter the name of your field and select the data type. We provide multiple data options to meet all your custom field needs. Click done. The field will now appear on all pages to which you added the field in the pages’ “Custom Fields” section. For example, if you created a bill custom field, that field will now appear on all bill pages in CQ+.
What custom field types does CQ+ provide?
CQ+ provides five custom field types.
- Text is a freeform text field where the user can write as much information as desired.
- Number is a text field where the user can enter a number or series of numbers.
- Date is a date/time selection widget that allows the user to specify a date.
- List of account users is a dropdown list of all users in the user’s account.
- Multiple choice allows the user to create a list of options. Create multiple choice options by entering the first option in the empty text field, then clicking the “+” icon next to the field. Enter the next choice in the same manner, and continue adding fields until you have the desired number of choices. You can drag and drop the fields to appear in a certain order by grabbing the selection tool to the left of each item.
How do I hide a custom field on CQ pages?
To hide a custom field from the pages where it appears, click on Settings>Custom Fields. Find the field and click the button that says “Visible.” The button should toggle to say “Hidden,” and will not appear on any pages. If you need to make the field reappear on the pages simply click the button again and it will toggle to say “Visible.” The field will remain in your account until you delete the field
How do I edit a custom field type?
To edit a custom field, click on Settings>Custom Fields. Find the field and click the “Edit” button. Change the current field type to the desired field type, then hit “Done.” Please note that you cannot edit the custom field type for a field that has already been populated on pages in CQ+. If you want to edit a custom field type for a field that has already been populated on pages in CQ+, find the pages where that field type appears and delete the field value type. You can find what pages that field type appears on by running a report based on custom criteria.
How do I delete a custom field?
To delete a custom field, click on Settings>Custom Fields. Find the field and click the “Edit” button. Select “Delete this field” and confirm that you want to delete the field. Deleting the field will delete it permanently across all pages; a deleted custom field cannot be restored. Please note that the vote custom fields “Position” and “Vote Caption” cannot be edited or deleted.
[/et_pb_tab][et_pb_tab title=”Reports”]CQ+ takes the copy-and-paste tedium out of creating bill, member, vote and news reports. Reports are dynamic, so changes are easy to make, and the data is always up-to-date.
How do I create a new report?
To create a new report, click on the folder icon from your CQ+ homepage, select Reports then click “New Report.” Pick what type of report you’re going to create, then hit “Choose.” You will then be prompted to select your data entry method.
How do I select what data displays in my report?
 To select data for your report, first select your preferred entry method.
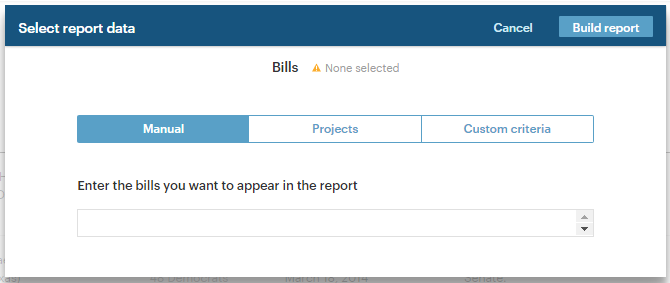
Manual will allow you to search for each bill, member or vote you want to appear in the report.
Projects will autofill the report with the data inside of the project that you selected; you can select multiple projects with which to populate the report. If you add another bill, member, vote or news story to the project, it will automatically appear in the report. For example, if you build a bill report based on the project “Bills we’re tracking” and add HR3 to the project “Bills we’re tracking,” the next time you open or refresh that bill report, HR3 will appear in the report.
Custom criteria will allow you to specify multiple parameters for what data populates your report – for example, all bills in the Senate that became law, or all members in the House from Texas. The report will automatically update based on the custom criteria you provide – so if you have a report based on all members in the House from Texas and a new one is elected, he or she will appear the next time you open or refresh that member report. If you want a daily news report on a certain topic, issue or member, you can set up a news report on the topic with a one-day range, and it will be updated every time you open or refresh the report.
After you’ve selected your data entry method hit “Build” to create the report.
How do I change my report’s name?
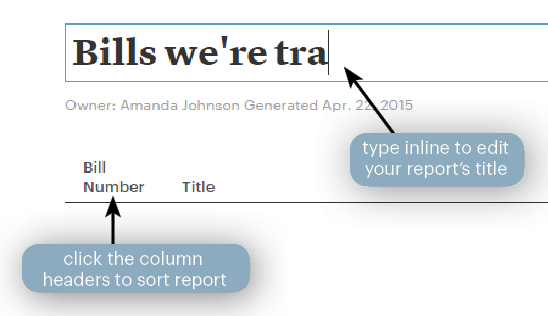 To rename a brand-new report that has not yet been saved, click the report title and start typing. Your report title will be edited inline.
To rename a saved report, click the “Edit” button in the toolbar along the top of the report, then click the report title and start typing. Your report title will be edited inline.
How do I sort my report?
To sort a brand-new report that has not yet been saved, click on the column titles to choose how you want to sort your report.
To sort a saved report, click the “Edit” button in the toolbar along the top of the report, then click on the column titles to choose how you want to sort your report.
What types of report templates does CQ+ provide?
CQ+ provides four types of report templates. More report template types will be added as demand is generated, so please contact your account rep to suggest a report template type.
- Bill report: A report of bills to monitor their status and other critical information.
- Member report: A report on a member or multiple members of Congress and pertinent profile information.
- Vote scorecard: A report on user-selected votes by user-selected members of Congress that compares how the members’ votes compare with the organizations’ stance
- News report: A report of CQ News and other stories based on user-specified parameters.
How do I edit the way my report looks?
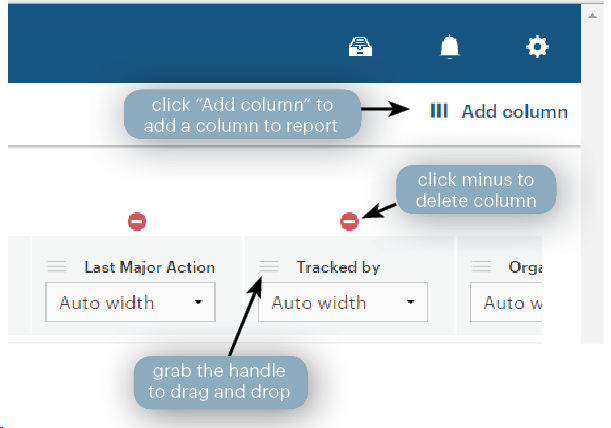 To edit a brand-new report’s layout and presentation, click “Change layout and fields.” Click the minus signs to remove columns from the report, or click “Add columns” to add more fields to your report. You can drag and drop the items to reorder them.
To edit a saved report’s layout and presentation, click “Edit” in the toolbar along the top of the report, then click “Change layout and fields.” Click the minus signs to remove columns from the report, or click “Add columns” to add more fields to your report. You can drag and drop the items to reorder them.
How do I change the data that’s in my report?
To edit the data in your report, click “Change data.” Select your preferred data entry method, then hit “Build.” Your report will now display the new data.
How do I save my report?
To save your report, click “Save.” Your report will now appear on your reports page. You can also add the report to a project by clicking the “Add to project” button.
How do I export my report?
To export your report as a file format, hit “Export” and select your preferred file type from the dropdown that appears. All reports can export as PDFs. Bill and vote reports can export as spreadsheets, and member and news reports can export as documents.
[/et_pb_tab][et_pb_tab title=”Notes”]In CQ+, you can author your own notes and tag them with related content. When you tag a note with related content the note will appear on the content page under the “Notes” section. You can add your notes to projects and share them with your colleagues.
How do I create a new note?
To create a new note, click the folder icon on your homepage and visit the notes page, then hit “New Note.” Enter a title for your note in the title field, and enter the text of your note in the body field. Click “Done” to save your note to your notes folder.
How do I add tags to a note?
To add tags your note, open the note and click “Edit.” Start typing your tag in the “Tags” fields that appear beneath the body of your note, and select them from the suggestions that appear. To add a second tag, start typing in the field again and select another one from the list of suggestions. You can add multiple tags to a note. To save your tags on the note, hit “Done.” Your tags will now appear on your note, and your note will now appear on the aggregation pages with which it is tagged.
How do I add a note to a project?
To add a note to a project, hit the “Add to projects” button in the toolkit across the top of your note. You can select multiple projects to add your note to, or choose to create a new project from the “Add to projects” dialogue.
How do I print a note?
To print your note, hit the “Print” button in the toolkit across the top of your note.
How do I share a note with all of the members in my account?
To share your note with all other members in your account, hit the “Share” button in the toolkit across the top of your note. Other users in your account will be notified that you shared the note with them through their notification center. Please note that making a note public to other users in your account will allow them to edit your note or add it to a project.
[/et_pb_tab][et_pb_tab title=”Searching”]Searching in CQ+ is now easier than ever. Using our quick search suggestions, you’ll quickly locate the items you’re trying to find, organized and streamlined with all of your custom content on those items directly on the page. Or, if you need to find an item by the product rather than the item’s subject, you can search for the item and select facets on our search results page to narrow the results to the document you need.
 Start typing in the CQ Plus search field in your navigation bar. You’ll see some suggestions appear based on keywords you enter. We’ll point you toward our bill, member, topic or committee pages, where we collect and organize all of the relevant CQ information on these items. You can even search for your own content that you’ve created.
If none of the suggestions are what you’re looking for, execute the search by either hitting enter or clicking the magnifying glass icon. On the search results page you can filter your results by clicking the facets in the left rail to narrow down the search results and find what you’re looking for.
[/et_pb_tab][et_pb_tab title=”Notifications”]The notification center is where certain actions are flagged for your attention. Visit the notification center by clicking on the bell icon in the upper right corner of your screen. Click on the items to visit them.
To delete an item from your notification center, click the x next to an item.
To clear all items from your notification center, click “Clear All” at the top of your notification center pane.